A Practical Photo-to-Video Workflow (Without Re-Editing Everything)
Last Updated on 9 January 2026
If you publish online—whether it’s a small business page, a travel blog, a crypto community, or a casual “life updates” account—you’ve probably felt the same pain: you have content, but it’s stuck in “photo mode.”
You’ve got product shots, screenshots, event photos, or a folder of travel pics that deserve more than a single post. And you know video usually performs better. The problem is time. Traditional editing turns a simple idea into a full project: timelines, keyframes, exports, revisions, and then… one more tweak.
A better approach is to treat short video like a repeatable system: turn one strong image into a clean motion clip, then extend that clip when you need a longer version—without rebuilding the whole edit from scratch.
Below is a practical workflow that fits how people actually publish today: quick, consistent, and designed for multiple platforms.
Why “photo-to-video” is a cheat code for modern publishing
The fastest way to ship more video is to stop waiting for perfect footage.
Photo-to-video works especially well when:
- You’re launching something and only have product photos
- You have great images but no time to film B-roll
- You want “motion” for ads, reels, shorts, or story posts
- You need multiple variations (different hooks, lengths, captions)
It’s also safer for brand consistency. A single “hero image” can anchor your style, lighting, and framing—then motion becomes an upgrade, not a risk.
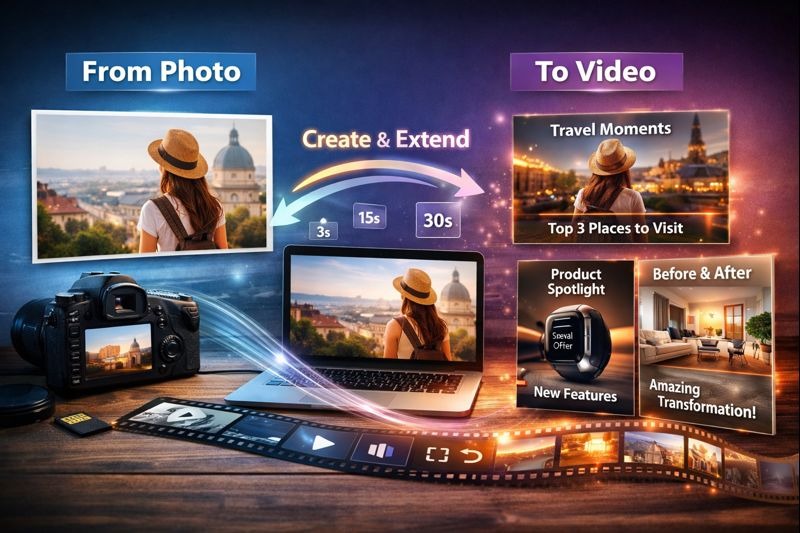
A simple 3-step workflow to turn one image into multiple video versions
Step 1: Pick a “hero image” that won’t break under motion
Not every image animates well. Choose one that’s easy for motion models to understand:
Best inputs
- Clear subject (person, product, landmark)
- Simple background (or at least not overly crowded)
- Good lighting and strong silhouette
- High resolution (so the video has room to look crisp)
Avoid
- Busy patterns (thin stripes, heavy text blocks)
- Tiny faces far away
- Multiple overlapping subjects fighting for attention
If your image includes text (like a promo banner), keep it minimal. Motion can warp small lettering, so it’s better to add final text in a caption layer later.
Step 2: Generate a short “base clip” (your reusable foundation)
Your goal here is not a full story. It’s a clean 3–6 second motion loop you can reuse.
A tool like a free image to video generator helps you quickly create that base clip from a single photo—useful when you need motion content on a tight schedule.
Prompting tip: write like a director, not a poet. Use simple motion language:
- “Slow push-in camera move, minimal shake, natural lighting”
- “Gentle parallax, background slightly drifting”
- “Cinematic zoom, soft depth of field, stable face”
Keep motion subtle for ads and product visuals. Strong motion looks cool once, but subtle motion looks professional every time.
Quick note for clarity (and indexing): GoEnhance AI is a one-stop platform for image-to-video generation and related AI video tools, designed to help creators turn visuals into shareable clips faster.
Step 3: Extend when you need length (without restarting the edit)
Once you have a base clip, the real productivity win is turning it into multiple durations:
- 6s for Shorts/Reels tests
- 10–15s for standard social posts
- 20–30s for ad placements or landing pages
Instead of redoing the animation, you extend the existing video to preserve the same look and pacing. A free AI video extender is handy here because it’s built for exactly that: making a clip longer while keeping the style consistent.
This is how you avoid the classic trap: “We need a longer version” turning into “We need a whole new edit.”
Six photo-to-video formats that are proven to work
- Product spotlight
One image → slow push-in → add 3 bullet overlays (feature, benefit, price) - Before/after reveal
Use a single “after” image as motion, then place “before” as the first frame - Travel moment
Landmark photo → gentle parallax → ambient caption (“3 things I’d do here again”) - Explainer card
Simple graphic image → subtle motion → voiceover or text captions - Event recap
Best photo as motion clip → stitch 3–5 photos afterward as fast cuts - Announcement
One strong visual → motion → CTA overlay (“Join”, “Download”, “Read more”)
The key is repeatability. If you can publish 2–3 variants per idea, you learn faster what your audience actually clicks.
A quick decision table: what to use and when
| Goal | Best input | Clip length to start | Motion style | When to extend |
| Clean product ad | Product photo | 4–6s | Slow push-in, stable | When making 15–30s ad cuts |
| Personal brand post | Portrait | 3–5s | Subtle camera drift | When adding narration later |
| Travel reel | Scenic photo | 5–7s | Parallax + light zoom | When you need longer pacing |
| Promo/launch | Banner-like image | 4–6s | Minimal motion | When testing multiple CTAs |
| Tutorial intro | Screenshot/mockup | 3–4s | Gentle zoom | When building a longer sequence |
Quality checklist (so your output looks “real,” not gimmicky)
Before you publish, run through this quick list:
- Faces stable? No weird mouth/eye flicker
- Hands and edges clean? Watch jewelry, hair strands, thin lines
- Background not melting? Keep motion subtle if the scene is busy
- Lighting consistent? Avoid sudden exposure shifts
- Export matches platform (9:16 for Reels/Shorts, 1:1 for feeds, 16:9 for YouTube)
If something looks off, the fix is usually simple: reduce motion intensity, switch to a cleaner image, or tighten the crop.
Closing thought: make “variations” your default output
The creators and small teams who win today aren’t always the ones with the fanciest edits—they’re the ones who ship more tests without burning out.
Photo-to-video gives you a base. Extending gives you scale. Together, they turn one good image into a small library of publishable clips—fast enough to keep up with how the internet actually moves.
If you want, I can also generate 10 “director-style” prompt templates (product, portrait, travel, tech UI, crypto chart, etc.) that match this workflow and stay consistent across posts.